A proper golf backswing sets the tone for everything that follows, from crisp iron shots to powerful drives. Even small flaws in posture or takeaway can cascade into bigger problems, forcing you to make complicated compensations on the downswing. When your backswing is fundamentally sound, you create a simpler path to solid ball-striking and more consistent results.
This article explores the pillars of a reliable backswing by merging setup principles, core mechanics, checkpoints, relaxation techniques, drills, and troubleshooting tips. You will also find a structured practice plan to help you integrate each lesson into actionable, daily routines. Read on to discover how a focused and connected backswing can elevate your game to new heights.
Lesson 1: The Non-Negotiable Backswing Setup
Establishing an Athletic Posture
A powerful backswing begins before the club even moves. Aligning your body correctly at address is often the difference between a fluid turn and a labored lift. Picture yourself hinging at the hips as if gently shutting a car door with your backside. Your chest should tilt forward until your eyes naturally settle over the toes, forming a straight line from shoulders to knees. This posture eliminates the rounded back that can restrict shoulder motion. By using a mirror to check the curve of your lower spine, you can confirm you are hinging instead of hunching. A flat lower back indicates a supportive posture that lets your shoulders and torso turn freely.
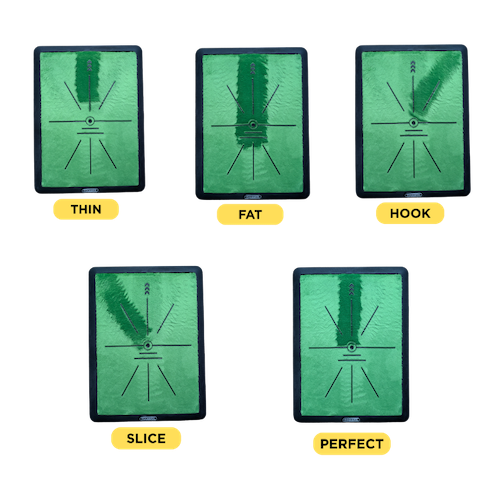
How to Fix Swing Flaws From Home Without a Coach or Expensive Gadgets
Struggling with thins, fats, slices—or just can’t tell what’s going wrong?
This swing mat shows you exactly how your club strikes the ball, giving instant visual feedback after every shot. With just a few swings, you’ll start spotting mistakes in your swing path that are otherwise invisible.
It’s a quick, low-hassle way to connect what you feel in your body with what’s really happening at impact.
Use it indoors or out, no ball required—just swing and learn. It’s one of the fastest ways to improve your swing right from home.
Finding the Right Grip Pressure
A good grip is firm enough to maintain control yet light enough to encourage fluid motion. Strangling the club can cause tension that radiates up through the forearms and into the shoulders, stunting your wrist hinge and forcing awkward reroutes. Instead, imagine the handle is a tube of toothpaste. You want to hold it securely without crushing it. This approach frees the wrists to hinge naturally, helps keep the clubface square, and allows you to maintain an effortless connection between arms and torso.
Building a Balanced Stance
Positioning your feet just outside shoulder width creates a stable platform while still allowing plenty of freedom to rotate. If your stance is too narrow, you may sway laterally in search of balance; if it is too wide, your hips can lock, and you will struggle to shift weight effectively. Aligning both feet slightly outward—similar to a duck’s stance—adds comfort and promotes a smooth pivot. Think of your lower body as an anchor giving your upper body room to coil and uncoil with minimal sway.
Softening the Trail Arm
A rigid trail arm can bulldoze your backswing off-plane. Instead, let that elbow fold as though you are cradling something delicate. When the trail elbow softens, your wrists can load the club upward, and your shoulders can complete a full coil. Overextending the arm pushes the club too far outside, priming you for slices or pulls. Paying attention to how your trail arm feels—especially in the first few feet of the swing—helps you keep the club in a neutral path and the shoulders turning in unison with your arms.
Initiating with the Hips
The hips are the engine that starts the entire motion. Rotating your trail hip away from the target triggers the backswing and allows your upper body to coil against a stable lower half. Leading with the shoulders, by contrast, causes your torso to move as one block. This reduces power and disrupts the proper club path. Placing a chair behind you and turning until your trail hip grazes it is a helpful way to confirm that your lower body is leading. When the hips spark the motion, your backswing stores up potential energy that you can unleash at impact.
Lesson 2: Achieving a Smooth Takeaway
Avoiding Push and Pull Mistakes
The earliest part of the backswing often goes awry when golfers either shove the club away with the trail hand or yank it inside with the lead hand in a grab for power. Either extreme breaks the connection between the arms and torso, setting off a chain reaction of reroutes later on. A smoother approach is to let the rotation of your chest initiate the takeaway, with the hands following rather than driving the motion. When the arms stay connected to the torso, the club remains on plane, making it easier to square the face at impact.
Curbing Hand Dominance
Hand dominance can sabotage the takeaway by making you overly reliant on one arm to control the club. If the trail hand pushes too early, the club drifts outside, creating a need for major compensation on the downswing. If the lead hand tugs the club inside, you risk burying it behind your body. To keep this in check, focus on a sensation of the torso leading and the hands reacting rather than vice versa. One effective rehearsal is to relax your trail hand for the first foot or so of the takeaway and let the lead arm guide the club back on plane.
Timing the Wrist Hinge
Wrist hinge is best allowed to happen gradually rather than forced early in the swing. When you snap the wrists upward too soon, the swing arc narrows and the clubface can close or open prematurely. Let the club lag behind your rotating torso and hinge naturally around the point when the shaft reaches hip height. Keeping the clubhead low and sweeping away from the ball provides a gentle start that sets you up for a more powerful arc. By the time you complete your takeaway, you want a relaxed, natural hinge that maintains a balanced relationship between shoulders, arms, and club.
Setting the Tone with the Chest
An easy way to blend these fundamentals is to imagine the logo on your shirt facing the ball for an extra beat as you begin moving away from address. This encourages your chest to turn first, pulling the arms and club along. As the club travels back, ensure your lead bicep fades against your chest rather than drifting out in front of it. Keeping the clubhead close to the ground initially also helps prevent an abrupt swing path. If you check yourself at hip height and see that the toe of the club is pointing skyward with your arms connected to your torso, you are on track for a smooth transition to the top.
Lesson 3: Key Checkpoints at the Halfway Back Position
Ensuring Proper Wrist Hinge
Reaching the halfway mark of the backswing is a pivotal moment. At this juncture, the wrists should be hinging in a way that cocks the club upward rather than rolling it open or shut. Think of hoisting a hammer directly upward rather than twisting a doorknob. When the wrists roll, the clubface can fall off-plane, inviting a slice or hook down the line. If your trail palm is facing the sky at halfway back, you have likely rotated instead of hinged, and the face is veering off track.
Aligning the Shaft with the Ball
A good checkpoint is to picture the end of your club as a laser pointer aimed at where the ball was on the ground. If the butt of the club is pointing too far inside, you risk a shallow path that can lead to hooks; if it points too far outside, you may set up an over-the-top motion. Consistency thrives when the shaft remains on a plane that runs from the ball through the center of your torso. This alignment reduces guesswork on the downswing and simplifies punching the club back through impact.
Positioning the Hands at Center
Halfway back is not just about club alignment but also the relationship of your hands to your chest. If your arms float too much to the inside, you will struggle to return the club on a solid path. When done properly, your hands seem to hover near your sternum. A quick glance down at this point can reveal whether your lead shoulder is hiding your hands from view. If you cannot see your hands because they have drifted behind you, the swing is likely too flat. Remaining centered helps keep the club in front of your body, poised to descend along a predictable route.
Using a Mirror for Self-Correction
A mirror is one of the most affordable swing coaches you can have. By facing a mirror and freezing halfway back, you can visually confirm that your wrists are cocked, the shaft is pointing at the ball’s location, and your hands have not strayed behind your torso. If you notice the clubface tilting open like a window, it is time to rehearse a more vertical hinge. Repeated mirror checks foster muscle memory that translates to the course, ensuring you do not get stuck or rerouted in mid-swing.
Lesson 4: Relaxation Techniques for Effortless Power
Understanding the Impact of Tension
Tension often creeps into a swing undetected, yet its negative effects are enormous. Muscles that are overly tight rob the backswing of its fluidity, forcing the downswing to start with a compensatory jolt. When the trail arm is stiff, the wrist hinge stalls, and the shoulders lock into a short turn. This can produce fat shots, as you cast the club early in panic mode, or weak slices if you hurriedly throw your arms over the top to rescue the shot. Recognizing tension is the first step to neutralizing it before it ruins your sequence.
Cultivating Soft Elbows and Shoulders
A gentle bend in the trail elbow allows the wrists to hinge fully, storing up the energy you can release at impact. Visualizing your trail arm cradling a delicate object can help maintain just enough firmness to support the club while avoiding a death grip that bruises your swing arc. Similarly, leaving your shoulders free to rotate, rather than bracing them rigidly, promotes a wide turn that gathers speed progressively. An engaged but relaxed upper body typically produces a smoother transition when shifting from backswing to downswing.
Recognizing Tension Through Ball Flight
When you sense your clubface opening or closing erratically, tension is often the culprit. An overly tight grip can delay the club’s release and cause slices, while tensed shoulders that yank the swing inside can result in low, diving hooks. By contrast, a swing free of tension often produces a mid-height flight that holds its line with minimal side spin. Monitoring your shots on the range, especially watching for jerky transitions or forced follow-throughs, offers clues about where tension might be lurking.
Harnessing Breath for a Natural Flow
Breathing can unify the rhythm of your swing, acting as a counterweight to tension. At address, try inhaling deeply through your nose, feeling your shoulders drop away from your ears. Then, as you begin your takeaway, exhale slowly, the way you might fog a mirror. This anchors your mind on a calm, consistent flow of air rather than mechanical corrections. The act of conscious breathing helps you relax your jaw, forearms, and shoulders, allowing the club to glide more naturally along its intended path.
Lesson 5: Drills for a Repeatable Backswing
Rehearsing Club Alignment in Front of a Mirror
One of the best ways to fix an inside or over-the-top takeaway is to stand about two feet from a full-length mirror. As you swing back slowly, pause when the shaft is parallel to the ground. This pause offers a crystal-clear picture of where the butt of your club is pointing and whether the lead arm remains visible or has disappeared behind your body. If the mirror shows the club angled toward your heels or the target line, you know an adjustment in swing path is needed. Maintaining a stable head position during these mirror checks ensures you build a takeaway free of unwanted sway.
Practicing a Late Wrist Hinge in Slow Motion
A second exercise is to take practiced swings without hitting a ball, using exaggerated slow motion. The goal is to delay your wrist hinge until the clubhead passes your trail thigh. This helps you feel the chest and shoulders initiating the movement before the wrists fold. Once at waist height, verify that the leading edge of the club matches the angle of your lead forearm rather than twisting away from it. This measured approach fosters the lag necessary for a dynamic release, imprinting the difference between a natural hinge and the forced snap that narrows your swing arc.
Pausing at the Top to Smooth Out Timing
Another drill is to hit balls at half speed from a paused position at the top of your backswing. Make your usual takeaway, freeze once you have fully coiled, then count to three. During this pause, confirm that your trail elbow points down rather than flaring and that your spine angle is consistent with your address posture. Resuming the downswing by shifting the lead hip toward the target feels more intuitive because the club wants to drop into the slot. This helps you break the habit of immediately lunging from the top or casting the club too early.
Lesson 6: Common Backswing Errors and How to Fix Them
Persistent Slice
A slice often derives from a flying trail elbow in the takeaway or an outside-in path driven by an overly active trail hand. Addressing this issue involves feeling your trail elbow remain closer to your ribcage to prevent the club from going outside the target line. If the ball curving right starts straight but then veers off, adjusting grip so the trail hand is less dominant can help square the clubface. Drills such as practicing with a headcover under your trail armpit reinforce a more connected takeaway.
Low Hook
A closed clubface paired with an over-the-top transition can wreak havoc on your accuracy, sending low hooks screaming left. Strengthening the lead hand grip so that more knuckles appear at address can stabilize the face and avoid excessive rollover. Widening the stance by a small margin also helps reduce lunging or spinning out in the downswing. A proper rotation that keeps the club on plane, rather than a lurch with the shoulders, resolves many hook issues since it eliminates forced rerouting from the top.
Hitting behind the ball, known as a “fat shot,” is often a product of an early release or poor weight shift. Placing a towel a few inches behind the ball in practice can reveal whether you are casting the club too soon. Maintaining the height of your trail hip as you turn prevents dipping. Visualizing a laser beam shining from your belt buckle can help route your hips levelly instead of letting them collapse. Proper extension through the shot, combined with delaying the release of the wrists, allows the club to strike the ball first rather than digging into the turf.
Shanking the Ball
A shank typically arises when the club path gets drastically steep or when tension in the fingers pulls the hosel toward the ball. Allowing the clubhead to remain outside your hands until about hip height in the takeaway helps combat this problem. If your grip pressure feels like you are strangling the handle, consciously loosen your last three fingers on the lead hand so the club can rotate properly. Preventing the face from fanning too far open early in the backswing is also essential to avoiding the dreaded shank.
Loss of Power
A flat shoulder turn or a disconnect between arms and torso can sap your swing of power. Visualizing the lead shoulder moving under the chin, rather than around it, promotes a steeper turn that coils the upper body. Pressing the lead bicep gently into your chest during the takeaway ensures your arms are following the turn rather than leading it. Power is preserved when the lower body initiates the downswing and the arms unfold last. Developing that proper sequence keeps your coil intact until the moment you release it into the ball.
Lesson 7: Putting It All Into Practice
Building consistency in your backswing requires a structured routine that blends alignment checks, tension awareness, and measured rehearsals. One way to start is to devote a few minutes each day to mirror work that examines takeaway and halfway-back positions. When you see the club butt oriented correctly and your lead arm remaining in view, you reinforce a path that better matches your shoulder turn. Gradually adding slow-motion swings instills the habit of delaying wrist hinge, letting your body instead of your hands drive the club’s initial path.
Incorporating a focus on tension can be done by alternating normal swings with deliberate breathing drills. You might take one swing at comfortable pace, then on the next swing, concentrate on exhaling throughout the backswing to prevent a surge of muscle tightness. Experiment with half-speed shots while pausing at the top, paying attention to how the club rests behind your shoulders and whether you can hold your spine angle. If you feel a rush to start the downswing, gently shift your weight to the lead side and let gravity settle the club. Over the course of a week, you can cycle through these elements—alignment, relaxed wrists, mirrored checkpoints, and smooth transitions—until they begin to feel ingrained.
As you approach the course, imitate tournament pressure by imagining high-stakes shots during your practice sessions. Visualize specific fairways or greens, and use the same pre-shot routine you plan to rely on when it counts. If you tend to lose focus, assign yourself consequences for poor contact, such as doing a few push-ups, to remind your body that each swing matters. By repeatedly blending mechanical awareness with mental rehearsal, you nurture a confident, repeatable motion that no longer feels like a laundry list of tips.
Conclusion
A well-honed backswing is the cornerstone of ball-striking consistency. By creating a stable setup, avoiding early takeaway errors, respecting key checkpoints at hip height, and reducing tension through mindful breathing, you pave the way for smooth power. Troubleshooting common mistakes then becomes straightforward since you understand the foundation that each element of the swing rests upon.
When you bring all these fundamentals to the practice range and follow a structured routine, your backswing becomes second nature. Over time, you will notice that instead of scrambling to correct errors mid-swing, you are building an unshakable process. Commit to this focused approach, and watch your golf game flourish as your backswing turns into one fluid, potent motion.