Ever watched professional golfers curve their shots elegantly around obstacles and wondered how they do it? The fade shot is a powerful tool in any golfer’s arsenal, allowing you to control the ball’s trajectory and navigate the course strategically. In this step-by-step guide, we’ll unlock the secrets to hitting a fade in golf, transforming your game and adding finesse to your swings.
Whether you’re aiming to impress your friends or lower your handicap, mastering the fade can give you the edge you’re looking for. Let’s dive into the techniques and adjustments that will help you execute this skillful shot with confidence.
Understanding the Golf Fade
A golf fade isn’t just a handy trick; it’s a skillful shot that right-handed golfers use to curve the ball gently from left to right. Imagine standing on the course, watching your ball arc gracefully through the sky with a little finesse. This is the art of the fade—a controlled curve that can turn a standard shot into something strategic and rewarding.
At its core, a fade is all about control and precision. The magic happens when you slightly open the clubface—not to the target, but relative to the swing path. This technical maneuver ensures the ball starts its journey left of the intended target before elegantly bending back toward it. It’s a subtle dance between the clubface angle and the swing path that seasoned golfers master for both form and function.
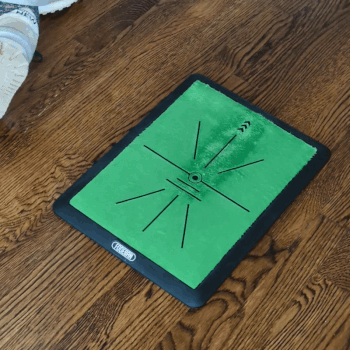
How to Fix Swing Flaws From Home Without a Coach or Expensive Gadgets
Struggling with thins, fats, slices—or just can’t tell what’s going wrong?
This swing mat shows you exactly how your club strikes the ball, giving instant visual feedback after every shot. With just a few swings, you’ll start spotting mistakes in your swing path that are otherwise invisible.
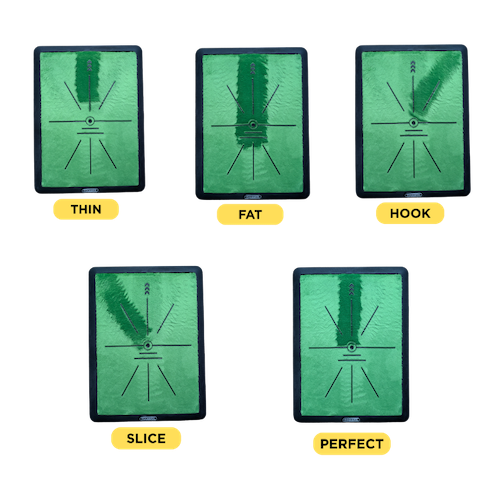
It’s a quick, low-hassle way to connect what you feel in your body with what’s really happening at impact.
Use it indoors or out, no ball required—just swing and learn. It’s one of the fastest ways to improve your swing right from home.
But why choose to play a fade? There are several advantages. Picture a course with a challenging dogleg to the right; a skillful fade lets you hug the bend, minimizing the distance to the hole. It’s like passing an obstacle by taking the smoothest curve.
Fades are also a golfer’s ally when battling certain wind conditions. A right-to-left breeze can nudge your shot off course, but a fade counters this with its controlled curve. It acts as a safeguard against the whims of nature, helping players maintain their direction.
For many golfers, a fade offers consistency. While less predictable shots can lead to errors, the fade is more reliable, offering a softer, more controlled landing. Such a shot isn’t just about reducing distance; it can enhance precision, making it a trusted weapon for tricky approach shots to the green.
Choosing to incorporate fades into your play can transform your game, turning potential hurdles into well-navigated pathways.
Mastering the Grip for a Fade
Achieving a fade starts with the essential matter of how you grip your club. Think of your grip as the conduit through which all intent is communicated to the clubface. To hit a successful fade, the clubface needs to be slightly open relative to the swing path when it meets the ball. This can be assisted by adjusting your grip.
Start by positioning the golf club in your left hand (for right-handed golfers). Let it rest diagonally across your fingers, aligning more with the base of your fingers rather than the palm. This encourages control and aids in manipulating the clubface for the right amount of openness.
Overlap or interlock your right hand so that your right pinky finger touches or hooks around your left index finger. This setup gives you better guidance and stability throughout your swing. While some sources might advocate for turning your hands more toward the right to achieve a firmer grip, it’s important to experiment and find what works best for your swing while aiming for that open clubface.
Setting the Stance for a Fade
Once you’ve got the grip down, focus on how you stand. The correct stance can influence the swing path, which is as crucial as the grip for creating a fade shot.
The key lies in the ball position within your stance. If you’re aiming for a high, soft fade, position the ball closer to your front foot. This adjustment subtly impacts the swing path, promoting a left-to-right curve. On the other hand, if a low stinger fade is what you’re after, shift the ball toward the back of your stance.
Foot placement and shoulder alignment also play a role. Align your feet to where you want the ball to start—slightly left of your target for right-handed golfers. Tilting your shoulders slightly can assist in establishing the correct swing path, guiding that gentle curving shot toward the target.
By carefully adjusting both your grip and stance, you’ll equip yourself with the foundational tools to confidently approach a fade shot. It’s about finding that personal sweet spot where grip meets stance, leading to consistent fades that enrich your golfing repertoire. Remember, practice is your ally, and minor tweaks might bring the major breakthroughs you seek on the course.
Aligning for a Fade: Body, Feet, and Clubface
Preparing to hit a fade involves more than just the grip and stance; it requires thoughtful alignment of your entire body. This setup ensures you can produce that beautiful left-to-right ball flight that characterizes a successful fade.
Let’s dive into the alignment secrets for hitting a fade, focusing on the strategic positioning of your feet, shoulders, and clubface.
Positioning Your Feet
Start with your feet. As a right-handed golfer, align them slightly left of your intended target. This isn’t about pointing your toes directly at the hole but rather aiming them to guide the ball along the desired flight path. Imagine the ball starting its journey slightly off the main target line to the left before gracefully curving back toward it.
Shoulder Orientation
Your shoulders should complement the position of your feet. Align them slightly open or square to your feet line. This subtle adjustment helps shape the swing path, encouraging that coveted fade trajectory. It might feel different at first, but remember, your shoulder line is a crucial player in this setup—it dictates the flow of your swing.
Setting the Clubface
Now comes the magic touch: the clubface. Align it toward the target line, but allow a slight openness relative to your swing path. This is where the artistry of a fade begins to blossom. It’s not just about leaving the clubface open for the sake of it; it’s about finding that precise angle that causes the ball to fade sweetly back toward your target after an initial leftward start.
Step-by-Step Alignment Guide
Getting these alignments right calls for a methodical approach. Here’s a simple step-by-step process:
- Align the Clubface: Point the clubface directly at your target. This sets the baseline for the rest of your setup.
- Set Your Feet: Align your feet left of the target line, ensuring they are parallel to each other, pointing in unison away from the target.
- Position Your Shoulders: Tilt your shoulders slightly open or square to your feet, adding a touch of openness to guide the swing path.
This precise alignment scheme not only charts the flight path of your ball but also instills confidence, allowing you to focus more on the swing and less on direction. It empowers your setup, making strategic fades into triumphs of precision and thoughtful preparation.
Swing Path for a Fade
To carve that graceful left-to-right ball flight, the swing path is your guiding beacon. The journey of the club through the swing is where the fade takes form. For right-handed golfers, imagine the clubhead moving slightly outside to inside as it connects with the ball. This isn’t a dramatic adjustment—just a 1 to 2-degree variation can do the trick. It’s subtle, yet immensely effective in influencing how the ball will fly.
The Body in Motion
Think of your body as the conductor of this orchestrated move. As you start your downswing, the shoulders play a crucial role. They gently guide the club along the desired path by rotating slightly open to accompany the outside-in movement. This shoulder motion, combined with a steady lower body, maintains balance and rhythm—essential for precision.
The arms follow suit, swinging naturally along this path while the hands hold their position, keeping the clubface in check. Your body’s coordinated motion ensures the clubface remains open relative to the swing path—not necessarily the target line—creating the precious fade.
Follow-Through Details
The elegance continues after the ball leaves the tee, with the follow-through adding its signature touch to a fade. Unlike a draw, where the follow-through may see the hands rotate more fully, the fade’s follow-through is a smoother gesture. The hands finish high and slightly left of the body. This position helps prevent over-rotation, keeping the clubface open just enough until the swing concludes.
Consider your club’s trajectory; it should exit on a higher note. The fade’s follow-through lets the club naturally rise into the air, mirroring the ball’s graceful path. It’s less about brute force and more about a polished, controlled movement, resulting in a shot that curves just as you intended.
Every swing is a moment to refine and perfect. The dance between your body, the club’s path, and the follow-through culminates in the majestic left-to-right flight of a fade. It’s about striking the balance between technical precision and fluid motion, making each shot a testament to the artistry of your game.
Common Mistakes and How to Avoid Them
Crafting a successful fade is an art form that requires both precision and subtlety. However, even seasoned golfers can trip up along the way. Here, we unravel some of the most common pitfalls and how to navigate them with finesse.
Overemphasizing the Fade
A common error is overdoing the fade in an attempt to create a pronounced curve. This often results in a slice, where the ball veers excessively to the right for right-handed golfers. Instead, aim for a gentle arc. Concentrate on a consistent, slightly open clubface in relation to your swing path to manage the curve without going overboard. Practice with smaller, more controlled swings to maintain balance and gradually build the fade you’re aiming for.
Misalignment Issues
Improper alignment is another big hurdle. If your alignment isn’t slightly left of your target, you might struggle to achieve the desired fade. When setting up, visualize a path that allows the ball to arc back toward the target rather than starting there. Align your clubface with the target, but set your feet and shoulders slightly left. Adding alignment markers during practice can reinforce the correct stance consistently.
Grip Pressure Problems
Gripping the club with excessive tension creates conflict with your clubface control. Too light a grip and the club may twist upon contact; too tight, and you’ll lack finesse. Aim for a neutral grip that’s firm but relaxed. This balance provides better overall control of your clubface, aiding in maintaining that perfect fade. Practicing your grip pressure on the range can illuminate what feels most natural and effective in different conditions.
Troubleshooting Your Fade
Even with the proper setup, your shot may not fade as expected. Here are some adjustments to consider:
Analyzing Swing Path
If the ball isn’t curving as anticipated, your swing path might be more inside-out or outside-in than needed. Strive for a controlled, consistent path slightly outside-in for the fade. Practicing with alignment sticks can offer visual guidance to fine-tune this aspect of your swing.
Adjusting Your Stance
Re-evaluating your foot placement might provide clues. If the ball is staying too straight or veering unexpectedly, make slight tweaks to your stance. Play with lateral ball positions within your stance to see their effects on ball flight. Moving the ball slightly more forward or back might better suit how you naturally swing.
By dissecting these common challenges and potential solutions, you’re equipping yourself with the tools to conquer the fade. Each tweak is a step closer to mastering a shot that can transform your game. Practice with intention, and let each modification guide you toward the fade’s graceful promise.
Practicing the Perfect Fade
Stepping onto the course with confidence requires more than just theoretical knowledge—it demands practice. Here’s a structured guide to mastering the fade through dedicated practice, complete with drills and scenarios to ensure you’re ready when it matters most.
The Foundation: Understanding Fundamentals
Before diving into specific drills, root your practice in the fundamentals. Begin by refining your grip, stance, and alignment. Experiment with grip pressure to discover what helps achieve that slightly open clubface. Use alignment sticks as visual aids to keep your stance and swing path on track. This groundwork sets the tone for your practice sessions, ensuring you’re tweaking the right elements for a consistent fade.
Phase 1: Indoor Drills for Feel and Feedback
Start small by practicing indoors where distractions are minimized. Use a full-length mirror or a video camera to film your swings. By observing your alignment and swing path, you’ll gain immediate feedback, helping you adjust and internalize the ideal positions for a fade. Focus on slow-motion swings without hitting a ball to understand what a proper swing path feels like.
Phase 2: Short Game and Range Work
Transition to the range with short irons, focusing on technique over distance. Begin by hitting soft fades with a wedge or 8-iron. This allows you to work on ball control without the pressure of hitting long shots. Identify a target slightly left of your actual aim to practice the curved flight—a visual confirmation of your adjustments paying off.
Progress to Longer Clubs
As you become comfortable, work your way up to longer clubs. Focus on replicating the same fade shape at varying distances. The goal is not just to shape the shot but to do so consistently. By paying attention to your swing path and the clubface through impact, you’ll refine the subtle nuances that distinguish a controlled fade from an erratic slice.
Phase 3: Integrating Fades into Real Scenarios
Take your practice one step further by simulating on-course challenges. Choose target areas on the range to mimic the doglegs and wind conditions you’ll encounter on the course. Practicing fades into the wind can be especially enlightening, teaching you how the shot reacts in different environments.
On-Course Application
Finally, move your practice to the course itself. Play casual rounds and intentionally select opportunities to attempt fades. Not every hole will require this shot, but by selectively using fades and analyzing your performance, you’ll build confidence. Tracking your progress not only boosts your morale but also fine-tunes your skill in adapting these techniques in pressure situations.
Embrace these drills and practice scenarios as a roadmap to mastering the fade. Each session is a step toward making those left-to-right beauties a staple of your golfing experience, turning theory into performance and practice into precision.
Conclusion
Mastering the fade shot can transform your golfing experience, adding precision and versatility to your game. By understanding and adjusting your grip, stance, alignment, and swing path, you can confidently execute a fade when the course demands it. Embrace the practice and patience required, and let this step-by-step guide be your companion as you carve elegant paths toward the green. The fade isn’t just a shot—it’s a strategic advantage that elevates your play and enhances your enjoyment of the game.